To use the Create Automatic Deployment
Rule Wizard to create the Automatic Deployment Rule for your Patch Tuesday
updates. Here are the steps:


1. In the SCCM 2012 administrator console, navigate to
the Software Library workspace.
2. Select Software Updates, and choose Automatic
Deployment Rules. Click the Create Automatic Deployment Rule option on the
ribbon to launch the Create Automatic Deployment Rule Wizard.
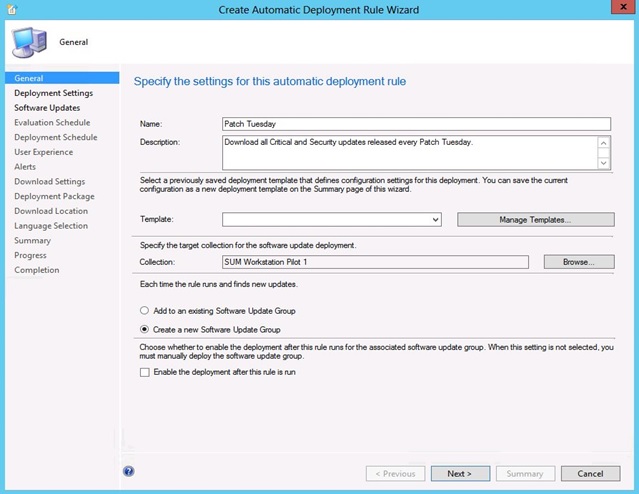
3. On the General page, which is shows in below screenshot, specify
Patch Tuesday in the Name field and a description in the Description field. In
the Collection field, enter or browse to the (Ex:SUM WRK Pilot I) collection you
created in your environment. For the Each time the rule runs and finds new updates option,
select Create a new Software Update Group. Although adding updates
to an existing software update group is useful when creating an Automatic
Deployment Rule for Endpoint Protection definition updates, it's not useful for
regular software updates. Here you'll create a new group every month.
Otherwise, you'll end up having too many updates in the group. (A software
update group has a limit of 1,000 updates.) Clear the Enable the
deployment after this rule is run check box. Click Next

Specifying the General Information for the Automatic Deployment Rule
4. On the Deployment Settings page, click Next.

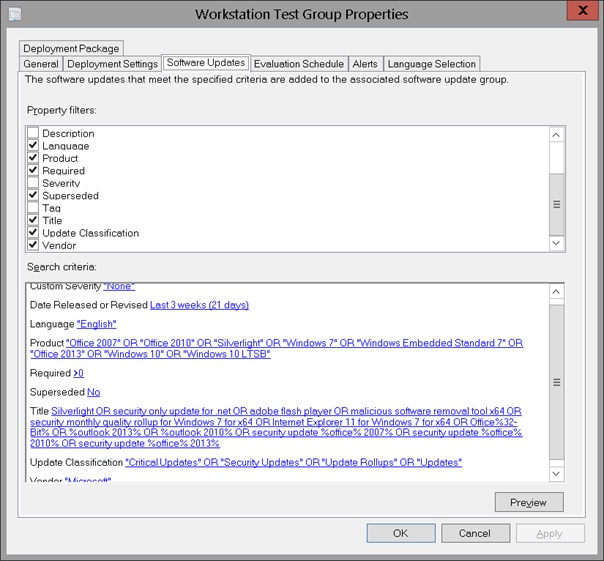
5. On the Software Updates page, select the following
filters and add the specified search criteria: Date Released or Revised: Last 3
weeks; Update Classification: "Critical Updates" OR
"Security Updates" OR "Updates Rollups" OR "Updates"; Title:
-as below.
Confirm that your page looks like the
one in below screenshot, then click Next.

Specifying the Filters and Search Criteria
6. On the Evaluation Schedule page, select Enable
rule to run on a schedule and click the Customize button. Configure
the rule to run the second Tuesday of every month at a time of your choosing.
Click OK, then click Next.

7. On the Deployment Schedule page, configure the
following settings. In the Time based on drop-down list,
select Client local time. In the Software available
time and Installation deadline sections, select As
soon as possible. You don't have to worry about this deadline being
too aggressive because this setting is being applied only to the devices in
your pilot group. For the production workstations, I recommend making the
updates available two days prior to the company-decided deadline. Updates will
start downloading in the background when they become available and will install
when the deadline is reached. Click Next.
8. On the User Experience page, select Display in
Software Center and show all notifications in the User
notifications drop-down list. In addition, suppress the system restart
on both servers and workstations, as shown in below screenshot. Click Next.

Configuring the User Experience Settings for
the Automatic Deployment Rule
9. On the Alerts page, you can configure SCCM to send an
alert when the compliance level drops below a certain percentage. To do this,
select the Generate an alert when the following conditions are met check
box. Then, in the Client compliance is below the following percent drop-down
list, select 95. Finally, set the Offset from the deadline option
to 35 days. This means that SCCM will generate an alert if the compliance level
isn't at 95 percent 35 days after the specified deadline. Click Next.
10. On the Download Settings page, configure the following
settings. Select Download software updates from distribution point
and install as the deployment option for the preferred distribution
point. Select Download and install software updates from the fallback
content source location as the deployment option to use when updates
aren't available on any preferred distribution point. Select
the Allow clients to share content with other clients on the same
subnet check box. Select the If software updates are not
available on preferred distribution point or remote distribution point, download
content from Microsoft Updates check box. This is a new SP1 feature
that allows clients to fall back and use Windows Update to download the
content. The client will only download content for the updates you have
approved. After making sure that your settings look like those in Figure 4,
click Next.

Figure 4: Specifying How to Download the Updates
11. On the Deployment Package page, you can either select
an existing deployment package or create a new one. For this example, create a
new one, specifying a name and description for it. In the Package Source field,
enter or browse to the folder containing the software update binary files.
Leave the sending priority at the default of medium. Click Next.
12. On the Distribution Points page, specify the
distribution points or distribution point groups to which you want to
distribute the package and click Next.
13. On the Download Location page, select Download
software updates from the Internet and click Next.
14. On the Language Selection page, select the languages
supported in your organization and click Next.
15. On the Summary page, click Save As Template. In the
Save As Template dialog box that appears, type Pilot Deployment I in the Name
field and click Save.
16. Click Next to have the wizard create the Automatic
Deployment Rule. When it completes, click Close.
You'll now see the Patch Tuesday rule in
the list of Automatic Deployment Rules. Manually run that rule by selecting it
and clicking the Run Now option on the ribbon, as shown in below screenshot. Click Yes
to start the process.
Running the Automatic Deployment Rule
Manually


oracle soa online training
ReplyDelete